
SpringBoot Bean生命周期
注:Spring Boot Bean的生命周期,什么是Bean的生命周期,就是Bean从创建到销毁的过程。
Bean的生命周期过程描述
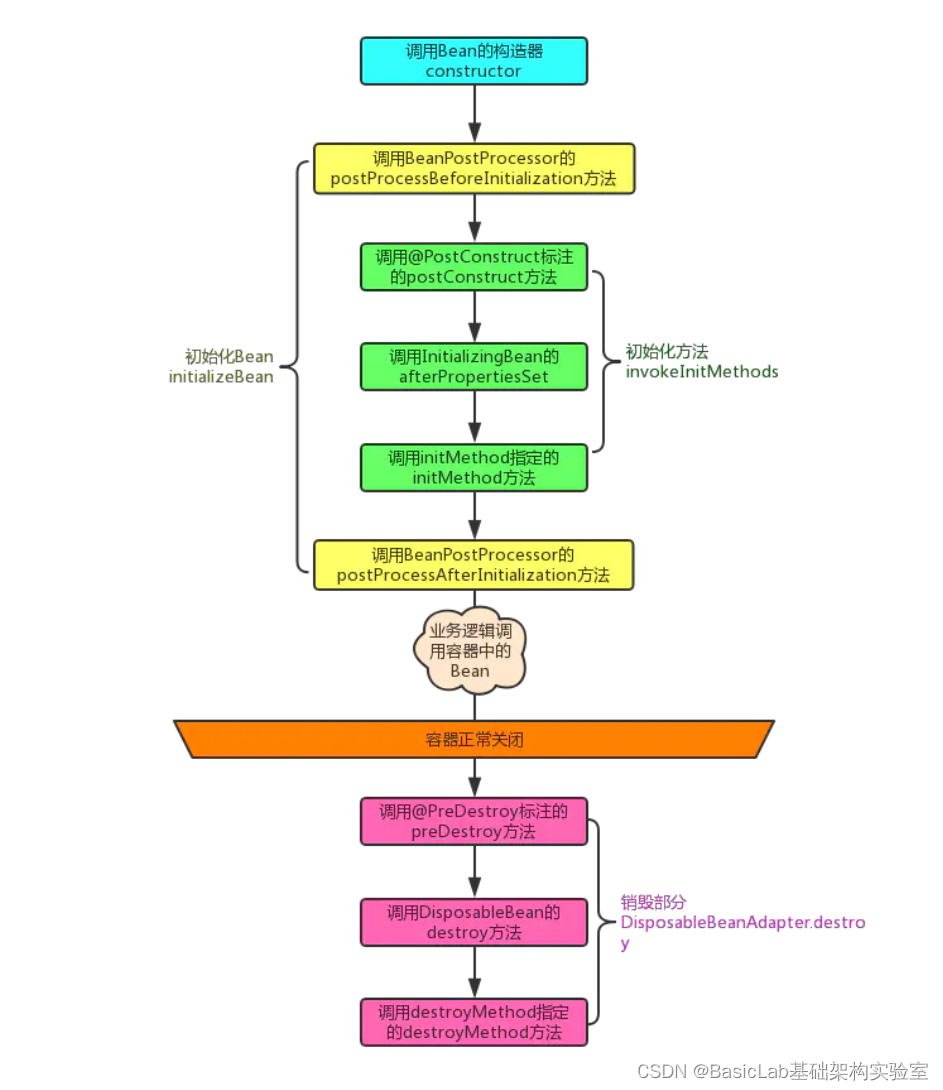
我们先看一下Bean的生命周期过程中都会经历些什么,我先简单解释一下,后面我们通过源码进行详细解释。首先Spring在实例化Bean的时候,会先调用它的构造函数,进行Bean的实例化,然后进行Bean的初始化,Bean的初始化经过三个阶段初始化之前(applyBeanPostProcessorsBeforeInitialization),其次是进行初始化(invokeInitMethods),最后是初始化之后(postProcessAfterInitialization),这就是Bean的初始化过程;然后就开始利用Bean进行业务逻辑处理,最后容器正常关闭,Spring开始销毁Bean,Bean的销毁过程相对比较简单,调用DisposableBeanAdapter.destroy()方法,该方法中有三个地方比较重要,分别触发Bean的生命周期方法,它们是:processor.postProcessBeforeDestruction(this.bean, this.beanName);
((DisposableBean) bean).destroy();
invokeCustomDestroyMethod(this.destroyMethod);
下面我把用图片来进行直观展示:
实例运行
User类,这里就是普通的一个Bean,用来添加到容器中,观察其生命周期
package com.itbofeng.bean;
import org.springframework.beans.factory.DisposableBean;
import org.springframework.beans.factory.InitializingBean;
import javax.annotation.PostConstruct;
import javax.annotation.PreDestroy;
public class User implements InitializingBean , DisposableBean {private String name;public User() {System.out.println("调用Bean的函数(constructor)");}public String getName() {return name;}public void setName(String name) {System.out.println("调用Bean的函数(setName/setAttribute)");this.name = name;}@PostConstructpublic void postConstruct(){System.out.println("调用Bean的函数(postConstruct)");}//MainConfig中@Bean 的initMethodpublic void initMethod(){System.out.println("调用Bean的函数(initMethod)");}//InitializingBean接口的方法afterPropertiesSet@Overridepublic void afterPropertiesSet() throws Exception {System.out.println("调用Bean的函数(afterPropertiesSet)");}@PreDestroypublic void preDestroy(){System.out.println("调用Bean的函数(preDestroy)");}//DisposableBean接口的方法destroy@Overridepublic void destroy() throws Exception {System.out.println("调用Bean的函数(destroy)");}//MainConfig中@Bean 的destroyMethodpublic void destroyMethod(){System.out.println("调用Bean的函数(destroyMethod)");}
}
CustomBeanPostProcessor类,用来观察BeanPostProcessor的运行时期
package com.itbofeng.bean;
import org.springframework.beans.BeansException;
import org.springframework.beans.factory.config.BeanPostProcessor;
import org.springframework.lang.Nullable;
import org.springframework.stereotype.Component;
@Component
public class CustomBeanPostProcessor implements BeanPostProcessor {@Nullable@Overridepublic Object postProcessBeforeInitialization(Object bean, String beanName) throws BeansException {if(bean.getClass()==User.class){System.out.println("调用postProcessBeforeInitialization...");}return bean;}@Nullable@Overridepublic Object postProcessAfterInitialization(Object bean, String beanName) throws BeansException {if(bean.getClass()==User.class){System.out.println("调用postProcessAfterInitialization...");}return bean;}
}
MainConfig类,SpringBoot程序运行的主类,并将User和CustomBeanPostProcessor 加入到容器中
package com.itbofeng;
import com.itbofeng.bean.User;
import org.springframework.boot.SpringApplication;
import org.springframework.boot.autoconfigure.SpringBootApplication;
import org.springframework.context.annotation.Bean;
@SpringBootApplication
public class MainConfig {public static void main(String[] args) {SpringApplication.run(MainConfig.class,args);}@Bean(initMethod = "initMethod",destroyMethod = "destroyMethod")public User user(){return new User();}
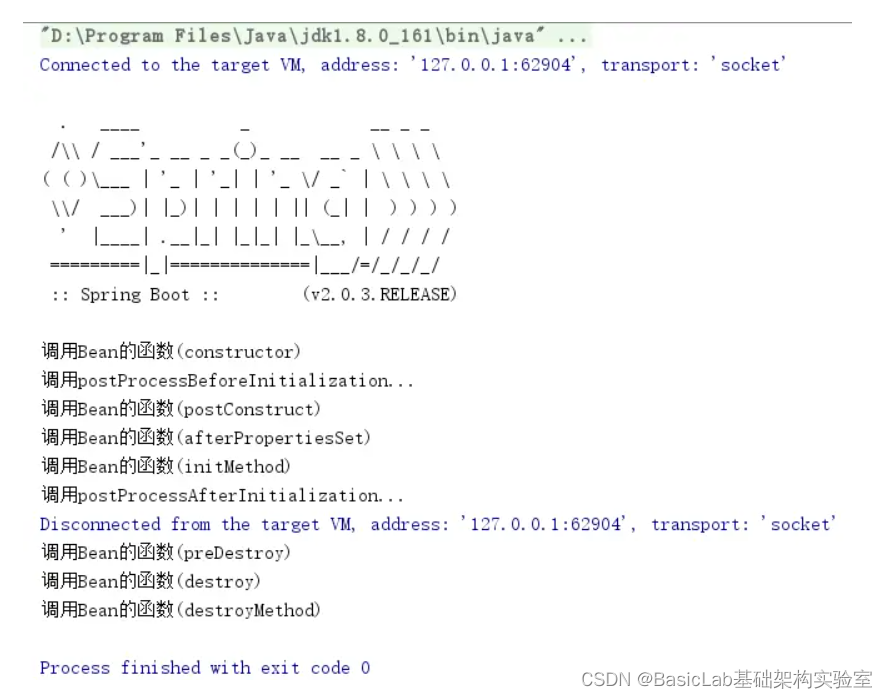
}运行结果查看
源码解析
初始化过程
首先我们将断点打到CustomBeanPostProcessor.postProcessBeforeInitialization的第一行代码,然后我看一下其方法调用栈:
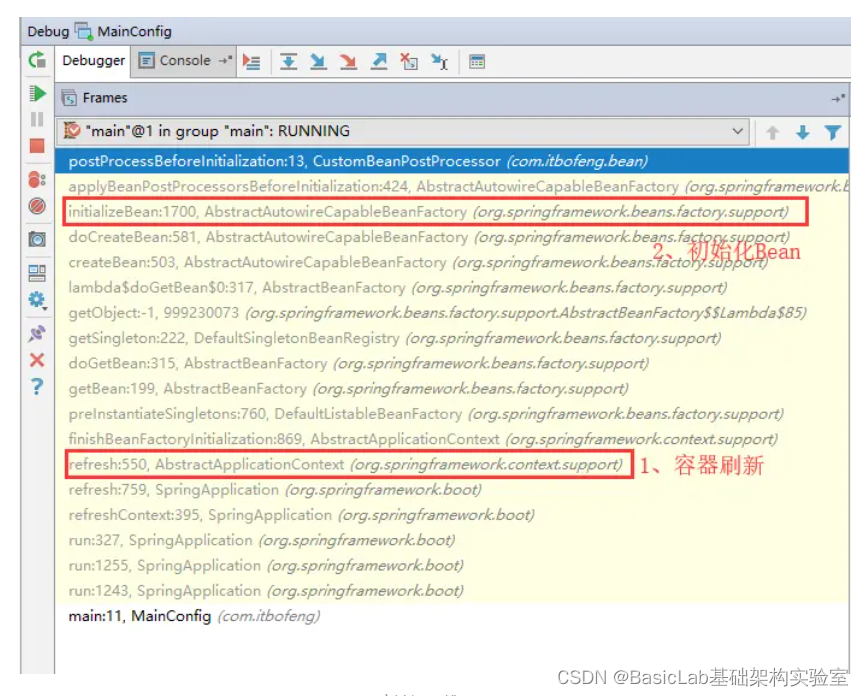
主要包括两个地方,一个是容器刷新,第二个是初始化Bean,我们先对这容器刷新的源码进行简单查看
public void refresh() throws BeansException, IllegalStateException {synchronized (this.startupShutdownMonitor) {// Prepare this context for refreshing.prepareRefresh();// Tell the subclass to refresh the internal bean factory.ConfigurableListableBeanFactory beanFactory = obtainFreshBeanFactory();// Prepare the bean factory for use in this context.prepareBeanFactory(beanFactory);try {// Allows post-processing of the bean factory in context subclasses.postProcessBeanFactory(beanFactory);// Invoke factory processors registered as beans in the context.invokeBeanFactoryPostProcessors(beanFactory);// Register bean processors that intercept bean creation.registerBeanPostProcessors(beanFactory);// Initialize message source for this context.initMessageSource();// Initialize event multicaster for this context.initApplicationEventMulticaster();// Initialize other special beans in specific context subclasses.onRefresh();// Check for listener beans and register them.registerListeners();// Instantiate all remaining (non-lazy-init) singletons.finishBeanFactoryInitialization(beanFactory);// Last step: publish corresponding event.finishRefresh();}catch (BeansException ex) {if (logger.isWarnEnabled()) {logger.warn("Exception encountered during context initialization - " +"cancelling refresh attempt: " + ex);}// Destroy already created singletons to avoid dangling resources.destroyBeans();// Reset 'active' flag.cancelRefresh(ex);// Propagate exception to caller.throw ex;}finally {// Reset common introspection caches in Spring's core, since we// might not ever need metadata for singleton beans anymore...resetCommonCaches();}}}注意finishBeanFactoryInitialization,上面说明也解释说该方法的作用是初始化所有剩下的非懒加载的单例Bean,从该描述也可以知道,懒加载和原型的Bean在该阶段并不会被加载,这部分代码是Spring容器刷新时的代码,也是Spring IOC比较核心的代码,在学习后面中,慢慢将该部分的代码慢慢学习,接下来我们看一下初始化Bean部分的代码:
protected Object initializeBean(final String beanName, final Object bean, @Nullable RootBeanDefinition mbd) {//对实现了Aware接口的方法进行执行,方法就在下方,使用方法直接实现对应的Aware接口即可if (System.getSecurityManager() != null) {AccessController.doPrivileged((PrivilegedAction以上就是初始化阶段,我们会发现初始化过程中没有@PostConstruct注解标注的方法,那是因为对@PostConstruct的处理也是BeanPostProcessor的实现类InitDestroyAnnotationBeanPostProcessor,那么我们就应该有疑问为什么InitDestroyAnnotationBeanPostProcessor.postProcessBeforeDestruction为什么会在CustomBeanPostProcessor.postProcessBeforeInitialization之后进行,是因为如果不指定顺序默认我们的getOrder为0,而InitDestroyAnnotationBeanPostProcessor的getOrder为Ordered.LOWEST_PRECEDENCE=2147483647,getOrder越大则,优先级越低,所以我们自定义的在其之前,至此初始化部分结束。
下面我们简单看一下销毁阶段:
public void destroy() {//处理@PreDestroy注解注释的方法if (!CollectionUtils.isEmpty(this.beanPostProcessors)) {for (DestructionAwareBeanPostProcessor processor : this.beanPostProcessors) {processor.postProcessBeforeDestruction(this.bean, this.beanName);}}//处理实现了DisposableBean接口的destroy的方法if (this.invokeDisposableBean) {if (logger.isDebugEnabled()) {logger.debug("Invoking destroy() on bean with name '" + this.beanName + "'");}try {if (System.getSecurityManager() != null) {AccessController.doPrivileged((PrivilegedExceptionAction结束语
至此,我们Bean的生命周期探索初步结束,后面再做进一步深入学习,在学习本节课时要多进行调试,断点跟踪,会更加有效果。另外无论是在初始化还是在结束时都是处理的单例的Bean,而且在初始化时,处理的Bean还是非懒加载的,所以需要特殊说明:非懒加载的单实例Bean的生命周期如上;懒加载的单实例Bean是在第一次获取进行初始化过程;原型Bean是在每次获取时都进行初始化,而且Spring容器不会管理器销毁。