
微信小程序自定义tabBar(实操)
创始人
2024-04-10 15:55:23
文章目录
- 一、前言
- 二、固定效果图实现步骤
- 实现步骤
- 完整代码-矢量图
- images图片
- app.json代码
- 三、自定义效果图实现步骤
- 实现步骤
- 完整代码-矢量图
- images图片
- app.json代码
- custom-tab-bar下的代码
- 使用自定义TaBar
一、前言
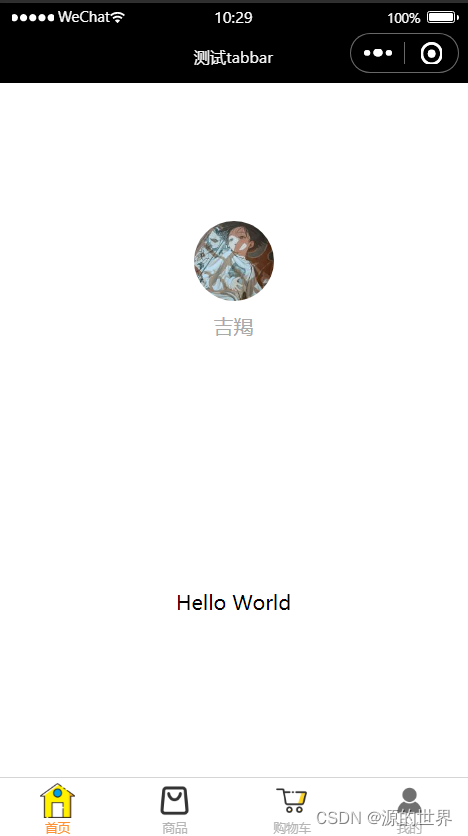
一般使用tabBar的样式,固定不能改变。如下固定效果图:
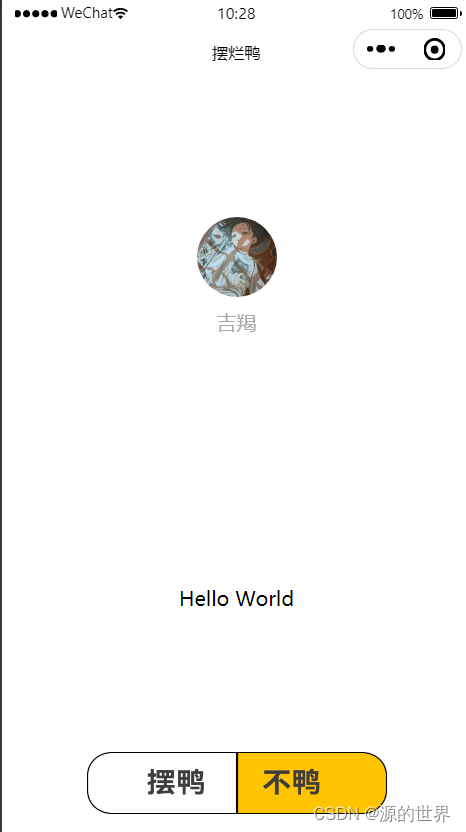
如何自定义自己想要的效果图呢,举个例子。如下自定义效果图:
二、固定效果图实现步骤
使用微信开发者工具-创建项目我就不说了,官方文档很详细。
参考:官方文档介绍
实现步骤
1、添加images文件,添加想要的矢量图(可通过阿里巴巴矢量图免费获取)
2、在app.json文件中,编辑代码
3、保存,刷新即可

完整代码-矢量图
images图片


app.json代码
{"pages":["pages/index/index","pages/logs/index","pages/commdt/index","pages/cart/index","pages/mymessage/index"],"window":{"backgroundTextStyle":"light","navigationBarTitleText": "测试tabbar","navigationBarTextStyle":"white"},"tabBar": {"color": "#B6B6B6","selectedColor": "#FE9132","list": [{"pagePath":"pages/index/index","text": "首页","iconPath":"/images/sy2.png","selectedIconPath": "/images/sy1.png"},{"pagePath":"pages/commdt/index","text": "商品","iconPath":"/images/sp2.png","selectedIconPath": "/images/sp1.png"},{"pagePath":"pages/cart/index","text": "购物车","iconPath":"/images/gwc2.png","selectedIconPath": "/images/gwc1.png"},{"pagePath":"pages/mymessage/index","text": "我的","iconPath":"/images/wd2.png","selectedIconPath": "/images/wd1.png"}]},"style": "v2","sitemapLocation": "sitemap.json"
}
三、自定义效果图实现步骤
实现步骤
1、添加images文件,添加想要的矢量图(可通过阿里巴巴矢量图免费获取)
2、在app.json文件中,编辑代码
3、点击加号,在根目录新建一个custom-tab-bar文件夹
4、然后右键该文件夹,点击新建components,输入index,回车,就会自动创建四个文件
此时我们可以看到小程序底部出现,就代表创建成功了。因为他自动识别了tabBar页面。
然后在该目录下编写代码即可
完整代码-矢量图
images图片


app.json代码
"window":{"backgroundTextStyle":"light","navigationBarBackgroundColor": "#FFFFFF","navigationBarTitleText": "摆烂鸭","navigationBarTextStyle":"black"},"tabBar":{"custom": true,"list":[{"pagePath":"pages/index/index","text":"摆鸭"},{"pagePath":"pages/commdt/index","text":"不鸭"}]},
custom-tab-bar下的代码
index.wxml
{list}}" wx:key="index" class="tab-bar-item" data-path="{{item.pagePath}}" data-index="{{index}}" bindtap="switchTab">{selected === index ? item.selectedIconPath : item.iconPath}}"> {currentName == item.name ? 'text-active' : 'tabbar-text'}}">{{item.text}} -->index.css
.tab-bar {position: fixed;bottom: 0;left: 0;right: 0;height: 130rpx;background: white;display: flex;padding-bottom: env(safe-area-inset-bottom);justify-content: center;
}.tab-bar-item {text-align: center;display: flex;flex-direction: column;
}.tab-bar-item cover-image {width: 240rpx;height: 100rpx;
}.tab-bar-item cover-view {font-size: 10px;
}
index.js
Component({/*** 组件的属性列表*/properties: {},/*** 组件的初始数据*/data: {selected: 0,color: "#7A7E83",selectedColor: "#3cc51f",list: [{"pagePath": "/pages/index/index","iconPath": "/images/by3.png","selectedIconPath": "/images/by1.png","text": "摆鸭"}, {"pagePath": "/pages/commdt/index","iconPath": "/images/by2.png","selectedIconPath": "/images/by4.png","text": "不鸭"}]},/*** 组件的方法列表*/methods: {switchTab(e) {console.log("执行跳转", e);const data = e.currentTarget.datasetconst url = data.pathwx.switchTab({url})this.setData({selected: data.index})}}
})
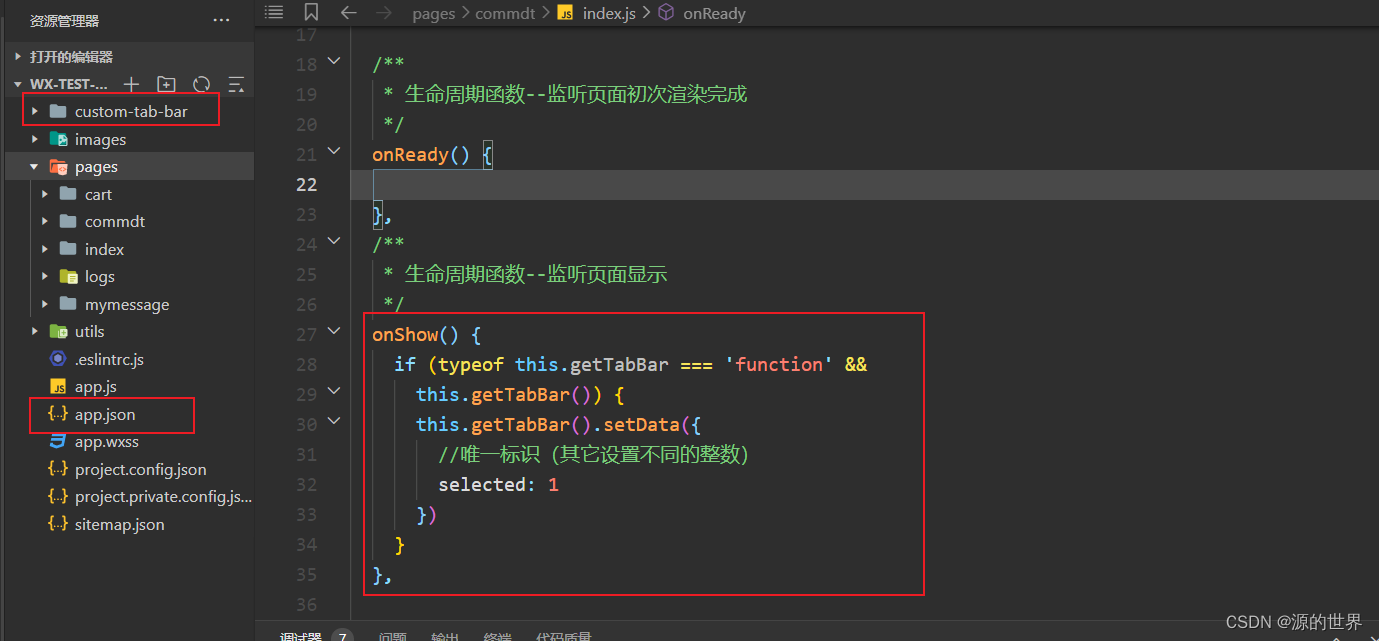
使用自定义TaBar
使用自定义TabBar,在切换的TabBar界面的onShow中添加如下代码。如首页中设置 selected: 0,我的中设置 selected: 2。因为 selected: 1 是特殊跳转,点击加号图标时,不再是切换tabbar,而是直接跳转发布界面了。
例如:
/pages/index/index 的.js页面添加代码
/*** 生命周期函数--监听页面显示*/onShow() {if (typeof this.getTabBar === 'function' &&this.getTabBar()) {this.getTabBar().setData({//唯一标识(其它设置不同的整数) selected: 0})}},
/pages/commdt/index 的.js页面添加代码
/*** 生命周期函数--监听页面显示*/onShow() {if (typeof this.getTabBar === 'function' &&this.getTabBar()) {this.getTabBar().setData({//唯一标识(其它设置不同的整数) selected: 1})}},

各位看官》创作不易,点个赞!!!
诸君共勉:万事开头难,只愿肯放弃。
免责声明:本文章仅用于学习参考
相关内容
热门资讯
哪...
在学习的过程中,使用还原空白试卷的方法是一种非常有效的学习工具。还原空白试卷是指将已经写过的试卷通过...
单...
单片机仿真软件有哪些及其比较?Multisim具有超强的板级模拟/数字电路板设计工作。 包括电路原理...
“...
哪种文字转语音广播软件最好? 百万粉丝用的情感配音软件有哪些? 接下来我们就来看看这个叫“来曲”的。...
i...
俗话说想要画好,软件必不可少但现在软件这么多,哪一款是我们“合适的”呢? ?今天小编要给大家带来的...
新一股冷空气今起影响我国,较大...
每经AI快讯,据中国天气网消息,今起三天(1月29日至31日),新一股冷空气将给我国带来降温,局地降...